I want to listen to Sverige Radio P1 in Mac OS X. It seems that Windows Media Player and RealPlayer are the only supported options so I thought I couldn’t do it but then I found Flip4Mac WMV Player also known as Windows Media® Components for QuickTime, by Flip4Mac™ . After installing it and restarting Safari 4, I could listen to SR P1 with no problem.
If the CyberDuck plugin is not working for you, (you can’t right-arrow to see the bookmarks) make sure that you changed the default nicknames of the bookmarks.
Probably if you open the Console you’ll find some “missing nickname” errors there.
[March19] [March 19] 7:31:22 PM Quicksilver[6037] Error: No 'Nickname' key for favorite:
As part of my Xbee sensor project, I created an object oriented API to access HMC6352 compass functionality and I decided to make it downloadable as an Hmc6352 Arduino Library.
Just unzip the file in the $arduino_home/hardware/libraries/. At the end you should end with $arduino_home/hardware/libraries/Hmc6352.
The library includes an example on how to use it (in File ⇒ Sketchbook ⇒ Examples ⇒ Library-Hmc6352 ⇒ Hmc6352.
The example looks like this (also available as gist):
<span class='line'>/*
</span><span class='line'> * hmc6352example.pde
</span><span class='line'> *
</span><span class='line'> * Copyright (c) 2009 Ruben Laguna <ruben.laguna at gmail.com>. All rights reserved.
</span><span class='line'> *
</span><span class='line'> *
</span><span class='line'> * This program is free software: you can redistribute it and/or modify
</span><span class='line'> * it under the terms of the GNU General Public License as published by
</span><span class='line'> * the Free Software Foundation, either version 3 of the License, or
</span><span class='line'> * (at your option) any later version.
</span><span class='line'> *
</span><span class='line'> * This program is distributed in the hope that it will be useful,
</span><span class='line'> * but WITHOUT ANY WARRANTY; without even the implied warranty of
</span><span class='line'> * MERCHANTABILITY or FITNESS FOR A PARTICULAR PURPOSE. See the
</span><span class='line'> * GNU General Public License for more details.
</span><span class='line'> *
</span><span class='line'> * You should have received a copy of the GNU General Public License
</span><span class='line'> * along with this program. If not, see <http://www.gnu.org/licenses/>.
</span><span class='line'> */
</span><span class='line'>
</span><span class='line'>
</span><span class='line'>#include <hmc6352.h>
</span><span class='line'>
</span><span class='line'>
</span><span class='line'>
</span><span class='line'>//set up hmc6352
</span><span class='line'>Hmc6352 hmc6352;
</span><span class='line'>
</span><span class='line'>
</span><span class='line'>void setup() {
</span><span class='line'> Serial.begin(9600);
</span><span class='line'> delay(100);
</span><span class='line'>
</span><span class='line'> Serial.print("RST\r\n");delay(100);
</span><span class='line'>}
</span><span class='line'>
</span><span class='line'>
</span><span class='line'>void loop()
</span><span class='line'>{
</span><span class='line'> hmc6352.wake();
</span><span class='line'> float a = hmc6352.getHeading();
</span><span class='line'> hmc6352.sleep();
</span><span class='line'>
</span><span class='line'> Serial.print((int)a,DEC);
</span><span class='line'> Serial.print("\r\n");
</span><span class='line'>
</span><span class='line'>}</span>
I talked about the DS1620 in a previous post. Now I created a DS1620 library for Arduino that has a more object oriented interface. The library has to be unpacked in the $arduino_home/hardware/libraries directory. After unzipping the library you should end up with a $ARDUINO_HOME/hardware/libraries/ds1620 directory.
The library contains an example that can be accessed through the File ⇒ Sketchbook ⇒ Examples ⇒ Library-ds1620 ⇒ ds1620.
The example looks like this:
/*
 ds1620 example
*/

#define ledPin 13

#include <stdlib.h>
#include <math.h>
//#include <Stdio.h>


#include "ds1620.h"


// set up ds1620
// this sets the pins as outputs
Ds1620 ds1620 = Ds1620(7/*rst*/,8/*clk*/,9/*dq*/);

void setup()
{

  // configure ds1620
  // this does sets cpu mode 1shot
  // see datasheet http://pdfserv.maxim-ic.com/en/ds/DS1620.pd
  ds1620.config();

  Serial.begin(9600);
  delay(100);


  Serial.print("RST\r\n");
}

void loop()
{
   // start the temperature conversion
   // 1 shot mode
   ds1620.start_conv();

   // read the last temperature converson
   int raw_data = ds1620.read_data();

   // stop conversion not really needed since we are in
   // 1 shot mode
   ds1620.stop_conv();
   float temp = raw_data / 2.0;
   Serial.print((int)temp,DEC);
   Serial.print("\r\n");
}
I finally put together an Arduino Pro Mini, the XBee, the MMA7260Q, the HMC6352, the TEMT6000 and the DS1620.
This is how it looks like on the prototyping board (ugly, I know)
Hopefully it would look better when I move it to the PCB. But before doing that I need to get the battery power set up. (I’m waiting for a MAX756 DC-DC voltage regulator and CoilCraft inductors to arrive)
The XBee uses the API mode and I implemented a Zigbee Application Layer protocol stack in Arduino instead of using the Serial interface like the rest of Arduino-XBee project that I’ve seen.
I implemented the Temperature Measurement Cluster ID (0x0402) and the Illuminance Measurement Cluster ID (0x0400) (see Zigbee Cluster Library ). Then I also two non-standard cluster ids, the Tilt Measurement Cluster ID (0xFC00) and the Heading Measurement Cluster ID (0xFC01).
Below you can find the main project file, from here I pass the control to the Xbee library and control the sleep cycle of the Arduino. The XBee library will invoke the callbacks (fgetTemperature, etc) when it needs the data. ie. it receives a read command. The callbacks(function pointers) point to functions in the main file (readDs1620, readTEMT6000, etc) and the callbacks are implemented in this main file which also contains the calls to ds1620 library, hmc6352 library and mma7260q library. To see the source files of the libraries download the sources. I also made independent libraries for ds1620, hmc6352 and mma7260q each one containing an example.
<span class='line'>/*
</span><span class='line'> XBee sensor
</span><span class='line'> ZCL Temperature Measurement Cluster
</span><span class='line'>*/
</span><span class='line'>
</span><span class='line'>#define ledPin 13
</span><span class='line'>
</span><span class='line'>#define lcdPin 6
</span><span class='line'>#define temt6000Pin 3
</span><span class='line'>
</span><span class='line'>
</span><span class='line'>#include <stdlib.h>
</span><span class='line'>#include <math.h>
</span><span class='line'>
</span><span class='line'>#include <Stdio.h>
</span><span class='line'>#include <SoftwareSerial.h>
</span><span class='line'>#include <avr/power.h>
</span><span class='line'>#include <avr/sleep.h>
</span><span class='line'>#include "XBeeLibrary.h"
</span><span class='line'>#include "ds1620.h"
</span><span class='line'>#include <Wire.h>
</span><span class='line'>#include "hmc6352.h"
</span><span class='line'>#include <math.h>
</span><span class='line'>#include <float.h>
</span><span class='line'>#include <limits.h>
</span><span class='line'>
</span><span class='line'>
</span><span class='line'>
</span><span class='line'>int xaxis = 0;
</span><span class='line'>int yaxis = 1;
</span><span class='line'>int zaxis = 2;
</span><span class='line'>
</span><span class='line'>float xa=0;
</span><span class='line'>float ya=0;
</span><span class='line'>float za=0;
</span><span class='line'>
</span><span class='line'>
</span><span class='line'>
</span><span class='line'>
</span><span class='line'>int minx = INT_MAX;
</span><span class='line'>int maxx = 0;
</span><span class='line'>int miny = INT_MAX;
</span><span class='line'>int maxy = 0;
</span><span class='line'>int minz = INT_MAX;
</span><span class='line'>int maxz = 0;
</span><span class='line'>
</span><span class='line'>float g0x = 0;
</span><span class='line'>float g0y = 0;
</span><span class='line'>float g0z = 0;
</span><span class='line'>
</span><span class='line'>//long time1 = 0;
</span><span class='line'>//long time2 = 0;
</span><span class='line'>
</span><span class='line'>
</span><span class='line'>// set up a new serial port
</span><span class='line'>SoftwareSerial lcdSerial = SoftwareSerial(lcdPin,lcdPin);
</span><span class='line'>byte pinState[16];
</span><span class='line'>byte backlightValue = 0x9D;
</span><span class='line'>
</span><span class='line'>// set up ds1620
</span><span class='line'>Ds1620 ds1620 = Ds1620(7/*rst*/,8/*clk*/,9/*dq*/);
</span><span class='line'>
</span><span class='line'>//set up hmc6352
</span><span class='line'>Hmc6352 hmc6352;
</span><span class='line'>
</span><span class='line'>
</span><span class='line'>void setup() {
</span><span class='line'> pinMode(ledPin, OUTPUT);
</span><span class='line'> pinMode(lcdPin, OUTPUT);
</span><span class='line'> pinMode(temt6000Pin,INPUT);
</span><span class='line'> pinMode(xaxis,INPUT);
</span><span class='line'> pinMode(yaxis,INPUT);
</span><span class='line'> pinMode(zaxis,INPUT);
</span><span class='line'>
</span><span class='line'> // set the data rate for the SoftwareSerial port
</span><span class='line'> lcdSerial.begin(4800);
</span><span class='line'>
</span><span class='line'> Serial.begin(9600);
</span><span class='line'> delay(100);
</span><span class='line'>
</span><span class='line'> // configure ds1620
</span><span class='line'> ds1620.config();
</span><span class='line'>
</span><span class='line'> //initial calibration of the MMA7260q
</span><span class='line'> minx = 173.0;
</span><span class='line'> miny = 192.0;
</span><span class='line'> minz = 258.0;
</span><span class='line'>
</span><span class='line'> maxx = 766.0;
</span><span class='line'> maxy = 720.0;
</span><span class='line'> maxz = 914.0;
</span><span class='line'>
</span><span class='line'> g0x = 469.0;
</span><span class='line'> g0y = 456.0;
</span><span class='line'> g0z = 586.0;
</span><span class='line'>
</span><span class='line'> lcdPrint("RST\r\n");delay(100);
</span><span class='line'>}
</span><span class='line'>
</span><span class='line'>long start =0;
</span><span class='line'>
</span><span class='line'>void loop()
</span><span class='line'>{
</span><span class='line'> struct zigbee zb;
</span><span class='line'> unsigned long time;
</span><span class='line'> unsigned long time2;
</span><span class='line'>
</span><span class='line'> xbee_init(&zb);
</span><span class='line'> zb.fgetTemperature = &readDs1620;
</span><span class='line'> zb.fprogress = &toggleLedPin;
</span><span class='line'> zb.ferror = &lcdPrint;
</span><span class='line'> zb.fprint = &lcdPrint;
</span><span class='line'> zb.fprintHex = &lcdPrintBuffer;
</span><span class='line'> zb.fgetHeading = &readHmc6352;
</span><span class='line'> zb.fgetIlluminance = &readTEMT6000;
</span><span class='line'> zb.fgetTilt = readMMA7260Q;
</span><span class='line'>
</span><span class='line'>
</span><span class='line'> XBee xbee(&zb);
</span><span class='line'>
</span><span class='line'> time = 0;
</span><span class='line'> time2 = 0;
</span><span class='line'>
</span><span class='line'> //lcdPrintInt(millis());
</span><span class='line'> while(1)
</span><span class='line'> {
</span><span class='line'> xbee.serve();
</span><span class='line'> if ((millis()-time) > 500) {
</span><span class='line'> time = millis();
</span><span class='line'> toggle(ledPin);
</span><span class='line'> //lcdSerial.print("ab\r\n");
</span><span class='line'> }
</span><span class='line'>
</span><span class='line'>
</span><span class='line'>
</span><span class='line'> int pfx /*valx*/ = analogRead(xaxis); // read the value from the sensor
</span><span class='line'> int pfy /*valy*/ = analogRead(yaxis); // read the value from the sensor
</span><span class='line'> int pfz /*valz*/ = analogRead(zaxis); // read the value from the sensor
</span><span class='line'>
</span><span class='line'>
</span><span class='line'> autoZeroCalibration(pfx,pfy,pfz);
</span><span class='line'>
</span><span class='line'>
</span><span class='line'>
</span><span class='line'> if ((millis()-time2) > 25000) {
</span><span class='line'> goToSleep();
</span><span class='line'> time2 = millis();
</span><span class='line'> }
</span><span class='line'>
</span><span class='line'> }
</span><span class='line'>}
</span><span class='line'>
</span><span class='line'>void goToSleep()
</span><span class='line'>{
</span><span class='line'> /* Now is the time to set the sleep mode. In the Atmega8 datasheet
</span><span class='line'> * http://www.atmel.com/dyn/resources/prod_documents/doc2486.pdf on page 35
</span><span class='line'> * there is a list of sleep modes which explains which clocks and
</span><span class='line'> * wake up sources are available in which sleep modus.
</span><span class='line'> *
</span><span class='line'> * In the avr/sleep.h file, the call names of these sleep modus are to be found:
</span><span class='line'> *
</span><span class='line'> * The 5 different modes are:
</span><span class='line'> * SLEEP_MODE_IDLE -the least power savings
</span><span class='line'> * SLEEP_MODE_ADC
</span><span class='line'> * SLEEP_MODE_PWR_SAVE
</span><span class='line'> * SLEEP_MODE_STANDBY
</span><span class='line'> * SLEEP_MODE_PWR_DOWN -the most power savings
</span><span class='line'> *
</span><span class='line'> */
</span><span class='line'>
</span><span class='line'> set_sleep_mode(SLEEP_MODE_IDLE); // sleep mode is set here
</span><span class='line'>
</span><span class='line'> sleep_enable(); // enables the sleep bit in the mcucr register
</span><span class='line'> // so sleep is possible. just a safety pin
</span><span class='line'>
</span><span class='line'> power_adc_disable();
</span><span class='line'> power_spi_disable();
</span><span class='line'> power_timer0_disable();
</span><span class='line'> power_timer1_disable();
</span><span class='line'> power_timer2_disable();
</span><span class='line'> power_twi_disable();
</span><span class='line'>
</span><span class='line'> digitalWrite(ledPin, 0);
</span><span class='line'> lcdPrint("slp\r\n");
</span><span class='line'>
</span><span class='line'> sleep_mode(); // here the device is actually put to sleep!!
</span><span class='line'>
</span><span class='line'> digitalWrite(ledPin, 1);
</span><span class='line'> lcdPrint("wk\r\n");
</span><span class='line'>
</span><span class='line'> // THE PROGRAM CONTINUES FROM HERE AFTER WAKING UP
</span><span class='line'> sleep_disable(); // first thing after waking from sleep:
</span><span class='line'> // disable sleep...
</span><span class='line'>
</span><span class='line'> power_all_enable();
</span><span class='line'>
</span><span class='line'>}
</span><span class='line'>
</span><span class='line'>void toggleLedPin() {
</span><span class='line'> toggle(ledPin);
</span><span class='line'>}
</span><span class='line'>
</span><span class='line'>float readDs1620()
</span><span class='line'>{
</span><span class='line'> ds1620.start_conv();
</span><span class='line'> int raw_data = ds1620.read_data();
</span><span class='line'> ds1620.stop_conv();
</span><span class='line'> float temp = raw_data / 2.0;
</span><span class='line'> return temp;
</span><span class='line'>}
</span><span class='line'>
</span><span class='line'>float readHmc6352()
</span><span class='line'>{
</span><span class='line'> hmc6352.wake();
</span><span class='line'> float a = hmc6352.getHeading();
</span><span class='line'> hmc6352.sleep();
</span><span class='line'>
</span><span class='line'> return a;
</span><span class='line'>
</span><span class='line'>}
</span><span class='line'>
</span><span class='line'>
</span><span class='line'>
</span><span class='line'>
</span><span class='line'>void toggle(int pinNum) {
</span><span class='line'> // set the LED pin using the pinState variable:
</span><span class='line'> digitalWrite(pinNum, pinState[pinNum]);
</span><span class='line'> // if pinState = 0, set it to 1, and vice versa:
</span><span class='line'> pinState[pinNum] = !pinState[pinNum];
</span><span class='line'>}
</span><span class='line'>
</span><span class='line'>
</span><span class='line'>int readTEMT6000()
</span><span class='line'>{
</span><span class='line'> int val = analogRead(temt6000Pin);
</span><span class='line'> return val;
</span><span class='line'>}
</span><span class='line'>
</span><span class='line'>
</span><span class='line'>float readMMA7260Q(int a)
</span><span class='line'>{
</span><span class='line'> int pfx /*valx*/ = analogRead(xaxis); // read the value from the sensor
</span><span class='line'> int pfy /*valy*/ = analogRead(yaxis); // read the value from the sensor
</span><span class='line'> int pfz /*valz*/ = analogRead(zaxis); // read the value from the sensor
</span><span class='line'>
</span><span class='line'> autoZeroCalibration(pfx,pfy,pfz);
</span><span class='line'>
</span><span class='line'> int fx = (pfx - g0x);
</span><span class='line'> int fy = (pfy - g0y);
</span><span class='line'> int fz = (pfz - g0z);
</span><span class='line'>
</span><span class='line'> float ax = (fx*2.0)/((maxx-minx));
</span><span class='line'> float ay = (fy*2.0)/((maxy-miny));
</span><span class='line'> float az = (fz*2.0)/((maxz-minz));
</span><span class='line'>
</span><span class='line'>
</span><span class='line'> float rho = atan(ax/sqrt(pow(ay,2)+pow(az,2)))*(57.2957795129); //57.2957795129 degrees per rad
</span><span class='line'> float phi = atan(ay/sqrt(pow(ax,2)+pow(az,2)))*(57.2957795129);
</span><span class='line'> float theta = atan(sqrt(pow(ay,2)+pow(ax,2))/az)*(57.2957795129);
</span><span class='line'>
</span><span class='line'> switch (a)
</span><span class='line'> {
</span><span class='line'> case 1:
</span><span class='line'> return rho;
</span><span class='line'> break;
</span><span class='line'> case 2:
</span><span class='line'> return phi;
</span><span class='line'> break;
</span><span class='line'> case 3:
</span><span class='line'> return theta;
</span><span class='line'> break;
</span><span class='line'> default:
</span><span class='line'> break;
</span><span class='line'> }
</span><span class='line'> return 0;
</span><span class='line'>
</span><span class='line'>}
</span><span class='line'>
</span><span class='line'>
</span><span class='line'>
</span><span class='line'>void autoZeroCalibration(int pfx, int pfy, int pfz)
</span><span class='line'>{
</span><span class='line'> //if ((pfx < minx)||(pfy < miny)||(pfz < minz)||(pfx > maxx)||(pfy > maxy)||(pfz > maxz)) {
</span><span class='line'> // autozero calibration
</span><span class='line'> if (pfx < minx) minx = pfx;
</span><span class='line'> if (pfy < miny) miny = pfy;
</span><span class='line'> if (pfz < minz) minz = pfz;
</span><span class='line'>
</span><span class='line'> if (pfx > maxx) maxx = pfx;
</span><span class='line'> if (pfy > maxy) maxy = pfy;
</span><span class='line'> if (pfz > maxz) maxz = pfz;
</span><span class='line'>
</span><span class='line'> g0x = ((maxx - minx)/2)+minx;
</span><span class='line'> g0y = ((maxy - miny)/2)+miny;
</span><span class='line'> g0z = ((maxz - minz)/2)+minz;
</span><span class='line'>
</span><span class='line'> //printValues();
</span><span class='line'> //}
</span><span class='line'>}
</span><span class='line'>
</span><span class='line'>////////////////////////////////////
</span><span class='line'>//// Print functions
</span><span class='line'>//////////////////////////////////
</span><span class='line'>
</span><span class='line'>
</span><span class='line'>//void lcdPrintError(char *msg)
</span><span class='line'>//{
</span><span class='line'>// lcdSerial.print("err:");
</span><span class='line'>// lcdSerial.print(msg);
</span><span class='line'>//}
</span><span class='line'>
</span><span class='line'>void lcdPrint(char *msg)
</span><span class='line'>{
</span><span class='line'> //lcdSerial.print(millis());
</span><span class='line'> //lcdSerial.print(":");
</span><span class='line'> // lcdSerial.print(msg);
</span><span class='line'>
</span><span class='line'>}
</span><span class='line'>
</span><span class='line'>//void lcdPrintInt(long i)
</span><span class='line'>//{
</span><span class='line'>// lcdSerial.print(i, DEC);
</span><span class='line'>//}
</span><span class='line'>
</span><span class='line'>
</span><span class='line'>//void lcdPrintHex(byte *hex, int size)
</span><span class='line'>//{
</span><span class='line'>// for(int i=0;i<size;i++)
</span><span class='line'>// {
</span><span class='line'> //lcdPrintHex(hex[i]);
</span><span class='line'>// }
</span><span class='line'>//}
</span><span class='line'>
</span><span class='line'>void lcdPrintBuffer(byte *hex, int size)
</span><span class='line'>{
</span><span class='line'> //lcdPrintHex(hex,size);
</span><span class='line'> //lcdPrintBuffer(hex,size,"buf");
</span><span class='line'>}
</span><span class='line'>
</span><span class='line'>//void lcdPrintBuffer(byte *hex, int size, char *msg)
</span><span class='line'>//{
</span><span class='line'>
</span><span class='line'> //int i = 0;
</span><span class='line'> //while (i<size) {
</span><span class='line'> //lcdSerial.print(msg);
</span><span class='line'> //lcdSerial.print(" ");
</span><span class='line'> //lcdSerial.print(i);
</span><span class='line'> //lcdSerial.print("-");
</span><span class='line'> //lcdSerial.print(i+7);
</span><span class='line'> //lcdSerial.print("\r\n");
</span><span class='line'> //int len = min(size-i,8);
</span><span class='line'> //lcdPrintHex(hex+i,len);
</span><span class='line'> //lcdSerial.print("\r\n");
</span><span class='line'> //i=i+8;
</span><span class='line'> //}
</span><span class='line'> // lcdSerial.print("\r\n");
</span><span class='line'>//}
</span><span class='line'>
</span><span class='line'>//void lcdPrintHex(byte hex)
</span><span class='line'>//{
</span><span class='line'>// lcdSerial.print((hex&0xF0)>>4,HEX);
</span><span class='line'>// lcdSerial.print((hex&0x0F),HEX);
</span><span class='line'>//}</span>
This is the java gui I built to test the implementation
The DEV-08165 is a Serial USB Board from Sparkfun. I use it to get logs from the Arduino, the logs are outputed in serial form on pin 6 , because the serial port (USART) on the ATmega is being used for the XBee communication. The DEV-8772 is the board to program the Arduino Pro Mini, the pro mini does have an USB connector on board like other Arduinos, you need the DEV-8722 to program it/power it
7E 00 02 8A 06 6F

7E    : API Frame
00 02 : Length
8A    : Modem status
06    : Coordinator started
6F    : checksum FF – ((8A +06) & FF) = 6F
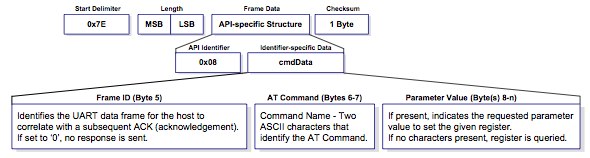
AT Command API Frame: MY
7e 00 04 08 52 4D 59 FF

7E    : API Frame
00 02 : Length
08    : AT Command Frame id
52    : Frame id
4d 59 : MY (4d 59) (4d ⇒ M, 59 ⇒ Y) Get the 16-bit network address of the module.
FF    : checksum ff = ff – ((08+52+4d+59) & ff)
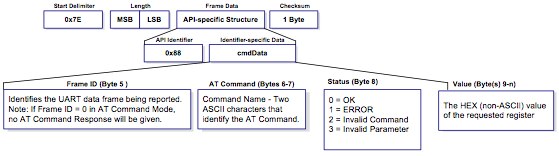
AT Command Response: MY
7e 00 07 88 52 4d 59 00
00 00 7f

7E    : API Frame
00 07 : Length
88    : AT Command Response API Identifier
52    : Frame id
4d 59 : MY (4d 59) (4d ⇒ M, 59 ⇒ Y) Get the 16-bit network address of the module.
00    : Status 0=OK
00 00 : MY value, 00 000 not set
7f    : checksum ff = ff – ((08+52+4d+59) & ff)
The only problem is that the code that you should add is not properly shown in the post. He just copied the xml code verbatim in the post without escaping it and the browser doesn’t display it properly. So I’m reproducing it here for your convenience.
Go to the theme editor. Appearance ⇒ Editor
Click on Theme Files ⇒ Templates ⇒ Single post (single.php)
Change the class of the first div to be “narrowcolumn” instead of “widecolumn”
That is, replace:
1
1
<span class='line'><div id="content" class="widecolumn"></pre> with <pre lang="xml"><div id="content" class="narrowcolumn"></span>
Add a call to get_sidebar() at the end just before get_footer()
Hope this helps. Remember that it was Angsuman Chakraborty who came up with the solution. I just merely reproduced it here because I noticed that xml code in the original post is not readable.
The GraphView demo uses a Force Directed Layout algorithm to dinamically position the nodes on the screen. It’s really fast and cool. Download prefuse and experiment with it by yourself.
I wanted to achieve something similiar with the Visual Library and I succeed up to a point. The force based layout algorithm that I implemented is much simpler that the used in prefuse, so there is no spring-like movement. It looks way cooler with springs. It just uses repulsion between nodes and attraction between connected nodes.
There is also some performance issues with the Visual Library as well, the performance is not what I expected but this is maybe due to how I use the library. Or just maybe it’s just because the implementation of the layout algorithm is not as efficient as it should be. If anybody knows of a better way of using it please leave a comment in the blog.
I should warn you before that this is just a proof-of-concept on how to get a minimum force based layout algorithm working with Netbeans Visual Library. This is a starting point, it don’t think the algorithm is usable for any non-trivial app app in this state. But from here you can get the idea on how to implement your own dynamic layout (force-based or not).
This is a video of the Force Directed Layout in action:
/*
* DynamicLayoutDemoTopComponent.java
*
* Copyright (c) 2009 Ruben Laguna <ruben.laguna at gmail.com>. All rights reserved.
*
* This program is free software: you can redistribute it and/or modify
* it under the terms of the GNU General Public License as published by
* the Free Software Foundation, either version 3 of the License, or
* (at your option) any later version.
*
* This program is distributed in the hope that it will be useful,
* but WITHOUT ANY WARRANTY; without even the implied warranty of
* MERCHANTABILITY or FITNESS FOR A PARTICULAR PURPOSE. See the
* GNU General Public License for more details.
*
* You should have received a copy of the GNU General Public License
* along with this program. If not, see <http://www.gnu.org/licenses/>.
*/
package com.rubenlaguna;
import java.awt.BorderLayout;
import java.util.concurrent.Executors;
import java.util.concurrent.ScheduledExecutorService;
import java.util.concurrent.TimeUnit;
import java.util.logging.Logger;
import javax.swing.JComponent;
import org.openide.util.NbBundle;
import org.openide.windows.TopComponent;
import org.openide.windows.WindowManager;
//import org.openide.util.ImageUtilities;
import org.netbeans.api.settings.ConvertAsProperties;
import org.netbeans.api.visual.graph.GraphScene;
import org.netbeans.api.visual.graph.layout.GridGraphLayout;
import org.netbeans.api.visual.layout.LayoutFactory;
import org.netbeans.api.visual.layout.SceneLayout;
/**
* Top component which displays something.
*/
@ConvertAsProperties(dtd = "-//com.rubenlaguna//DynamicLayoutDemo//EN",
autostore = false)
public final class DynamicLayoutDemoTopComponent extends TopComponent implements Runnable {
private static DynamicLayoutDemoTopComponent instance;
/** path to the icon used by the component and its open action */
// static final String ICON_PATH = "SET/PATH/TO/ICON/HERE";
private static final String PREFERRED_ID = "DynamicLayoutDemoTopComponent";
private GraphSceneImpl2 scene;
private JComponent view;
private static ScheduledExecutorService EX = Executors.newSingleThreadScheduledExecutor();
private SceneLayout sceneGraphLayout;
public DynamicLayoutDemoTopComponent() {
initComponents();
setName(NbBundle.getMessage(DynamicLayoutDemoTopComponent.class, "CTL_DynamicLayoutDemoTopComponent"));
setToolTipText(NbBundle.getMessage(DynamicLayoutDemoTopComponent.class, "HINT_DynamicLayoutDemoTopComponent"));
// setIcon(ImageUtilities.loadImage(ICON_PATH, true));
scene = new GraphSceneImpl2();
view = scene.createView();
jScrollPane1.setViewportView(view);
add(scene.createSatelliteView(), BorderLayout.WEST);
scene.addNode("1");
scene.addNode("2");
scene.addNode("3");
scene.addNode("4");
scene.addNode("5");
scene.addNode("6");
scene.addNode("7");
scene.addNode("8");
scene.addNode("9");
scene.addNode("10");
scene.addNode("11");
scene.addNode("12");
scene.addNode("13");
scene.addNode("14");
scene.addNode("15");
scene.addNode("16");
scene.addNode("17");
scene.addNode("18");
scene.addNode("19");
scene.addNode("20");
scene.addNode("21");
scene.addNode("22");
scene.addNode("23");
scene.addNode("24");
scene.addNode("25");
scene.addEdge("1", "2");
scene.addEdge("2", "3");
scene.addEdge("3", "4");
scene.addEdge("4", "5");
scene.addEdge("6", "7");
scene.addEdge("7", "8");
scene.addEdge("8", "9");
scene.addEdge("9", "10");
scene.addEdge("11", "12");
scene.addEdge("12", "13");
scene.addEdge("13", "14");
scene.addEdge("14", "15");
scene.addEdge("16", "17");
scene.addEdge("17", "18");
scene.addEdge("18", "19");
scene.addEdge("19", "20");
scene.addEdge("21", "22");
scene.addEdge("22", "23");
scene.addEdge("23", "24");
scene.addEdge("24", "25");
scene.addEdge("1", "6");
scene.addEdge("2", "7");
scene.addEdge("3", "8");
scene.addEdge("4", "9");
scene.addEdge("5", "10");
scene.addEdge("6","11");
scene.addEdge("7","12");
scene.addEdge("8","13");
scene.addEdge("9","14");
scene.addEdge("10","15");
scene.addEdge("11","16");
scene.addEdge("12","17");
scene.addEdge("13","18");
scene.addEdge("14","19");
scene.addEdge("15","20");
scene.addEdge("16","21");
scene.addEdge("17","22");
scene.addEdge("18","23");
scene.addEdge("19","24");
scene.addEdge("20","25");
GridGraphLayout<String, String> graphLayout = new GridGraphLayout<String, String>();
//sceneGraphLayout = LayoutFactory.createSceneGraphLayout(scene, graphLayout);
//sceneGraphLayout.invokeLayout();
ForceDirectedLayout<String, String> graphLayout2 = new ForceDirectedLayout<String, String>();
graphLayout.setAnimated(false);
sceneGraphLayout = LayoutFactory.createSceneGraphLayout(scene, graphLayout2);
EX.schedule(this, 50, TimeUnit.MILLISECONDS);
}
/** This method is called from within the constructor to
* initialize the form.
* WARNING: Do NOT modify this code. The content of this method is
* always regenerated by the Form Editor.
*/
// <editor-fold defaultstate="collapsed" desc="Generated Code">//GEN-BEGIN:initComponents
private void initComponents() {
jScrollPane1 = new javax.swing.JScrollPane();
setLayout(new java.awt.BorderLayout());
add(jScrollPane1, java.awt.BorderLayout.CENTER);
}// </editor-fold>//GEN-END:initComponents
// Variables declaration - do not modify//GEN-BEGIN:variables
private javax.swing.JScrollPane jScrollPane1;
// End of variables declaration//GEN-END:variables
/**
* Gets default instance. Do not use directly: reserved for *.settings files only,
* i.e. deserialization routines; otherwise you could get a non-deserialized instance.
* To obtain the singleton instance, use {@link #findInstance}.
*/
public static synchronized DynamicLayoutDemoTopComponent getDefault() {
if (instance == null) {
instance = new DynamicLayoutDemoTopComponent();
}
return instance;
}
/**
* Obtain the DynamicLayoutDemoTopComponent instance. Never call {@link #getDefault} directly!
*/
public static synchronized DynamicLayoutDemoTopComponent findInstance() {
TopComponent win = WindowManager.getDefault().findTopComponent(PREFERRED_ID);
if (win == null) {
Logger.getLogger(DynamicLayoutDemoTopComponent.class.getName()).warning(
"Cannot find " + PREFERRED_ID + " component. It will not be located properly in the window system.");
return getDefault();
}
if (win instanceof DynamicLayoutDemoTopComponent) {
return (DynamicLayoutDemoTopComponent) win;
}
Logger.getLogger(DynamicLayoutDemoTopComponent.class.getName()).warning(
"There seem to be multiple components with the '" + PREFERRED_ID +
"' ID. That is a potential source of errors and unexpected behavior.");
return getDefault();
}
@Override
public int getPersistenceType() {
return TopComponent.PERSISTENCE_NEVER;
}
@Override
public void componentOpened() {
// TODO add custom code on component opening
}
@Override
public void componentClosed() {
// TODO add custom code on component closing
}
void writeProperties(java.util.Properties p) {
// better to version settings since initial version as advocated at
// http://wiki.apidesign.org/wiki/PropertyFiles
p.setProperty("version", "1.0");
// TODO store your settings
}
Object readProperties(java.util.Properties p) {
DynamicLayoutDemoTopComponent singleton = DynamicLayoutDemoTopComponent.getDefault();
singleton.readPropertiesImpl(p);
return singleton;
}
private void readPropertiesImpl(java.util.Properties p) {
String version = p.getProperty("version");
// TODO read your settings according to their version
}
@Override
protected String preferredID() {
return PREFERRED_ID;
}
public void run() {
sceneGraphLayout.invokeLayout();
EX.schedule(this, 50, TimeUnit.MILLISECONDS);
}
}
The GraphScene that I use is very simple. It’s based on GraphScene.StringGraph:
/*
* GraphSceneImpl2.java
*
* Copyright (c) 2009 Ruben Laguna <ruben.laguna at gmail.com>. All rights reserved.
*
* This program is free software: you can redistribute it and/or modify
* it under the terms of the GNU General Public License as published by
* the Free Software Foundation, either version 3 of the License, or
* (at your option) any later version.
*
* This program is distributed in the hope that it will be useful,
* but WITHOUT ANY WARRANTY; without even the implied warranty of
* MERCHANTABILITY or FITNESS FOR A PARTICULAR PURPOSE. See the
* GNU General Public License for more details.
*
* You should have received a copy of the GNU General Public License
* along with this program. If not, see <http://www.gnu.org/licenses/>.
*/
package com.rubenlaguna;
import org.netbeans.api.visual.anchor.AnchorFactory;
import org.netbeans.api.visual.graph.GraphScene;
import org.netbeans.api.visual.widget.ConnectionWidget;
import org.netbeans.api.visual.widget.LabelWidget;
import org.netbeans.api.visual.widget.LayerWidget;
import org.netbeans.api.visual.widget.Widget;
/**
*
* @author ecerulm
*/
public class GraphSceneImpl2 extends GraphScene.StringGraph {
private int edgeID = 0;
private LayerWidget mainLayer;
private LayerWidget connectionLayer;
public GraphSceneImpl2() {
mainLayer = new LayerWidget(this);
connectionLayer = new LayerWidget(this);
addChild(mainLayer);
addChild(connectionLayer);
}
@Override
protected Widget attachNodeWidget(String node) {
LabelWidget w = new LabelWidget(this, node);
mainLayer.addChild(w);
return w;
}
@Override
protected Widget attachEdgeWidget(String edge) {
ConnectionWidget connectionWidget = new ConnectionWidget(this);
connectionLayer.addChild(connectionWidget);
return connectionWidget;
}
@Override
protected void attachEdgeSourceAnchor(String edge, String oldSourceNode, String sourceNode) {
((ConnectionWidget) findWidget (edge)).setSourceAnchor (AnchorFactory.createRectangularAnchor (findWidget (sourceNode)));
}
@Override
protected void attachEdgeTargetAnchor(String edge, String oldTargetNode, String targetNode) {
((ConnectionWidget) findWidget (edge)).setTargetAnchor (AnchorFactory.createRectangularAnchor (findWidget (targetNode)));
}
public void addEdge(String source, String target) {
String id = "edge" + (edgeID++);
addEdge(id);
setEdgeSource(id, source);
setEdgeTarget(id, target);
}
}
And finally the ForceDirectLayout:
/*
* ForceDirectedLayout.java
*
* Copyright (c) 2009 Ruben Laguna <ruben.laguna at gmail.com>. All rights reserved.
*
* This program is free software: you can redistribute it and/or modify
* it under the terms of the GNU General Public License as published by
* the Free Software Foundation, either version 3 of the License, or
* (at your option) any later version.
*
* This program is distributed in the hope that it will be useful,
* but WITHOUT ANY WARRANTY; without even the implied warranty of
* MERCHANTABILITY or FITNESS FOR A PARTICULAR PURPOSE. See the
* GNU General Public License for more details.
*
* You should have received a copy of the GNU General Public License
* along with this program. If not, see <http://www.gnu.org/licenses/>.
*/
package com.rubenlaguna;
import java.awt.Point;
import java.awt.Rectangle;
import java.util.ArrayList;
import java.util.Collection;
import java.util.Collections;
import java.util.Comparator;
import java.util.HashMap;
import java.util.HashSet;
import java.util.Iterator;
import java.util.LinkedList;
import java.util.List;
import java.util.Map;
import java.util.Random;
import org.netbeans.api.visual.graph.layout.GraphLayout;
import org.netbeans.api.visual.graph.layout.UniversalGraph;
import org.netbeans.api.visual.model.ObjectScene;
import org.netbeans.api.visual.widget.Widget;
/**
*
* @author ecerulm
*/
public class ForceDirectedLayout<N, E> extends GraphLayout<N, E> {
private Random random = new Random();
private boolean firstTime = true;
@Override
protected void performGraphLayout(UniversalGraph<N, E> graph) {
ObjectScene scene = graph.getScene();
Collection<N> allNodes = graph.getNodes();
Map<N, Point> forceForEachNode = new HashMap<N, Point>();
if (firstTime) {
List<Point> list = new ArrayList<Point>();
for (Iterator<N> it = allNodes.iterator(); it.hasNext();) {
N object = it.next();
Point point = new Point(random.nextInt(600), random.nextInt(600));
list.add(point);
}
for (int i = 0; i < (list.size() / 2); i++) {
Point p = list.get(i);
for (int j = i + 1; j < list.size(); j++) {
Point p2 = list.get(j);
double distance = Math.sqrt(Math.pow(p2.x - p.x, 2) + Math.pow(p2.y - p.y, 2));
if (distance < 40) {
p2.translate(30, 30);
}
}
}
;
for (Iterator<N> it = allNodes.iterator(); it.hasNext();) {
N object = it.next();
Point p = list.remove(0);
setResolvedNodeLocation(graph, object, p);
scene.findWidget(object).setPreferredLocation(p);
}
firstTime = false;
return;
}
//initialize forceForEachNode map
for (Iterator<N> it = allNodes.iterator(); it.hasNext();) {
N object = it.next();
forceForEachNode.put(object, new Point(0, 0));
}
//Calculate repulsion forces
for (Iterator<N> it = allNodes.iterator(); it.hasNext();) {
N thisNode = it.next();
HashSet<N> allOtherNodes = new HashSet<N>(allNodes);
allOtherNodes.remove(thisNode);
for (Iterator<N> it1 = allOtherNodes.iterator(); it1.hasNext();) {
N otherNode = it1.next();
Point thisWidget = scene.findWidget(thisNode).getLocation();
Point otherWidget = scene.findWidget(otherNode).getLocation();
if ((null != thisWidget) && (null != otherWidget)) {
int x = thisWidget.x - otherWidget.x;
int y = thisWidget.y - otherWidget.y;
double sum = Math.pow(x, 2) + Math.pow(y, 2);
double distance = Math.sqrt(sum);
double minDist = 50.0;
x = ((int) (x * (minDist / distance))); //inversely proportional to the distance
y = ((int) (y * (minDist / distance)));
//Point force = new Point(x,y);
Point currentForce = forceForEachNode.get(thisNode);
currentForce.translate(x, y);
}
}
}
// get got all the repulsion forces.
//now the attraction forces.
for (Iterator<N> it = allNodes.iterator(); it.hasNext();) {
N thisNode = it.next();
for (E edge : graph.findNodeEdges(thisNode, true, false)) {
N otherNode = graph.getEdgeTarget(edge);
if (otherNode != null) {
Point thisWidget = scene.findWidget(thisNode).getLocation();
Point otherWidget = scene.findWidget(otherNode).getLocation();
if ((null != thisWidget) && (null != otherWidget)) {
int x = thisWidget.x - otherWidget.x;
int y = thisWidget.y - otherWidget.y;
double sum = Math.pow(x, 2) + Math.pow(y, 2);
double distance = Math.sqrt(sum);
double minDist = 50.0;
x = -((int) (x * (distance / 30))); //directly proportional to the distance
y = -((int) (y * (distance / 30)));
//Point force = new Point(x,y);
Point currentForce = forceForEachNode.get(thisNode);
currentForce.translate(x, y);
currentForce = forceForEachNode.get(otherNode);
currentForce.translate(-x, -y);
}
}
}
}
//Use the force (silly joke)
for (Iterator<N> it = allNodes.iterator(); it.hasNext();) {
N object = it.next();
Point force = forceForEachNode.get(object);
int x = force.x / 50;
int y = force.y / 50;
if (x > 0) {
x = Math.min(x, 15);
} else {
x = Math.max(x, -15);
}
if (y > 0) {
y = Math.min(y, 15);
} else {
y = Math.max(y, -15);
}
//x = x+((int) (x * (((float)random.nextInt(5)) / 100.0)));
//y = y+((int) (y * (((float)random.nextInt(5)) / 100.0)));
x = x + (-3+random.nextInt(6));
y = y + (-3+random.nextInt(6));
Point newPosition = scene.findWidget(object).getLocation();
if (null != newPosition) {
newPosition.translate(x, y);
setResolvedNodeLocation(graph, object, newPosition);
}
}
}
@Override
protected void performNodesLayout(UniversalGraph<N, E> graph, Collection<N> nodes) {
throw new UnsupportedOperationException("Not supported yet.");
}
}
The result is shown in the picture below. Of cource, you can’t see the dinamic behaviour of this layout algorithm in the picture. You’ll have to download and execute this Netbeans Platform Application: dynamiclayoutdemo (Netbeans 6.7 M2) to see it with you own eyes.


