Ruben Laguna’s blog

Running a Custom TestRunner From Rake

I was surprised when I searched in Google for ways of running a custom TestRunner in a Rake::TestTask and I couldn’t find anything directly.

So after figuring out myself how it’s done I decided to share it here:

Compiling OpenChronos in Windows

I got the EZ430 Chronos some days ago and after play around a little with the Code Composer Studio v4 that comes with it (the free code size limited version) I got the TI firmware compiled and uploaded to the watch. Then I realized that what I compiled it was a stripped down version of the firmware called Limited as the code-size-limited CCSv4 cannot be used to compiled the Unrestricted firmware.

From Textdrive to Joyent Shared Accelerator

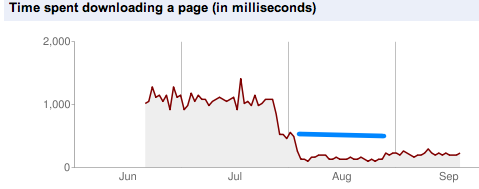
After delaying it for long, long time I finally moved from Textdrive to Joyent Shared Accelerator. The improvement has been considerable. The response time has halved (blue line), and after a few days I switched to jekyll for the blog platform and the improvements has been event bigger!

Fixing Disqus

I was checking the Disqus threads for my site in the Disqus web page and I noticed that there was something wrong. Some threads had the wrong url, pointing to http://localhost:4000 and some had the wrong title (instead of the title the url was showing). I came to the conclusion that this was due to the fact that I’ve been using disqus_developer=1 to test locally after migrating to Disqus and the threads that I visited for the first time locally got the local url (localhost) and the because disqus couldn’t get the title from that url (since it was a local url) it assigned a title based on the (local) url.

So I decided to fix it using the Disqus API and I wrote the following script

that uses a slightly modified version of the disqus ruby. I had to modify the disqus ruby because the original version can only iterate over the first 25 threads.

DiffMerge/WinMerge for Cygwin Git

After reading several blogs and pages I got SourceGear DiffMerge and WinMerge working with Cygwin’s Git.

First you need to put some scripts in the path that serve as wrapper for invoking DiffMerge and WinMerge.

I created 2 wrapper scripts for DiffMerge diffmerge-diff.sh and diffmerge-merge.sh See the source code in the gist.

I also created two more scripts for WinMerge: winmerge-diff.sh and winmerge-merge.sh. You can find the source code for scripts in the same gist.

All four scripts rely on githelperfunction.sh to properly convert the path and set variables.

The scripts above take into account:

  • Conversion of cygwin paths to Windows path
  • Handle filenames with whitespace
  • Handle properly non-existing files. Sometimes a file doesn’t exist in one of the branches you are comparing and then git will provide /dev/null as filename for that one. These scripts take care of converting that to a proper empty file in Windows.
  • DiffMerge: Set the window title in DiffMerge to the filename. And set labels for each file window to LOCALFROM_VERSION, REMOTETO_VERSION and BASEMERGED
  • WinMerge: Set the file labels to LOCALFROM_VERSION.filename and REMOTETO_VERSION.filename.

After storing those script and make them accessible from your $PATH then you need to tell git how to use them.

You can use the following commands to tell git about this wrappers:

1
2
3
4
5
6
7
8
9
10

1
2
3
4
5
6
7
8
9
10
<span class='line'># for difftool
</span><span class='line'>git config --global difftool.diffmerge.cmd "diffmerge-diff.sh \"\$LOCAL\" \"\$REMOTE\"" \"\$BASE\"" \"\$MERGED\""
</span><span class='line'>git config --global difftool.winmerge.cmd "winmerge-diff.sh \"\$LOCAL\" \"\$REMOTE\"" \"\$BASE\"" \"\$MERGED\""
</span><span class='line'>git config --global difftool.prompt false
</span><span class='line'>
</span><span class='line'># for mergetool
</span><span class='line'>git config --global mergetool.diffmerge.cmd "diffmerge-merge.sh \"\$LOCAL\" \"\$REMOTE\"" \"\$BASE\"" \"\$MERGED\""
</span><span class='line'>git config --global mergetool.diffmerge.trustExitCode false
</span><span class='line'>git config --global mergetool.winmerge.cmd "winmerge-merge.sh \"\$LOCAL\" \"\$REMOTE\"" \"\$BASE\"" \"\$MERGED\""
</span><span class='line'>git config --global mergetool.winmerge.trustExitCode false</span>

And then you can invoke git difftool and git mergetool using -t <TOOL> to indicate which one you want to use:

1
2
3
4

1
2
3
4
<span class='line'>git difftool -t diffmerge 
</span><span class='line'>git difftool -t winmerge
</span><span class='line'>git mergetool -t diffmerge
</span><span class='line'>git mergetool -t winmerge</span>

if you want to make any of those tools the default you can use git config to do so:

1
2

1
2
<span class='line'>git config --global diff.tool winmerge
</span><span class='line'>git config --global merge.tool diffmerge</span>

Hope this helps

Migrating From Wordpress 3.0 to Jekyll

I finally migrated from Wordpress to Jekyll. It wasn’t difficult but not easy either so I decided to write my experience in this blog.

I’m assuming that you setup a basic Jekyll site: _config.yml, _layouts, _posts, etc. A good start is to clone mojombo jekyll site and remove the _posts and images.

Although the Jekyll wiki describes how to use converters to migrate from Wordpress I didn’t follow that path because it requires direct access to the Mysql database.

So I found a migration script posted to Issue #20 that uses the Wordpress XML export as input. The script had a couple of problems, it didn’t handle international characters in the title, and it didn’t honor the original permalinks in WordPress.

So I modified it to fix those thing

To use it you need to have a wordpress.xml file in the same directory where you run the script and you need to modify the ORIGINAL_DOMAIN in the script to reflect your own. It will dump the published WordPress posts and comment as jekyll textile files in export/_posts.

The comments will be translate to a YAML file: export/_posts/comments.yml. If you want to import the comments to Disqus you can use the yamlcomments2disqus.rb script to import it.

The only thing that you need is to create a file called API-KEY in the same directory as yamlcomments2disqus.rb and write there your Disqus API key. The script will automatically post all non-spam comments to Disqus using Disqus API. The comments thread for each post is identified by the original Wordpress <wp:post_id> so then you have to add the following <script> along with the disqus regular javascript code (you can find it in http://disqus.com/comments/universal/<your site>/) in your layout.

I include here my _layouts/default.html, _layouts/post.html, atom.xml and sitemap.xml for reference

Wordpress Migration: ” (Quotes) and ’ (Apostrophe) Being Replaced With “ and ’

I migrated from TextDrive to a Joyent Shared Accelerator and in the process I had to migrate the Wordpress MySQL database as well. After the migration the " and ’ where showing as “ and ’ respectively. It was a charset problem. Apparently the problem was

that the data itself was already in UTF-8 within a Latin1 database (due to WP default charset).

So I did the backup again (like this)

1
2

1
2
<span class='line'>mysqldump --user=$DB1USER --password=$DB1PASSWD \
</span><span class='line'>  --default-character-set=latin1 $DB1NAME dump.sql</span>

and then I imported the dump.sql file again into the Joyent utf8 mysql:

1
2
3
4
5

1
2
3
4
5
<span class='line'>$ cat dump.sql |sed  -e 's/DEFAULT CHARSET=latin1;/DEFAULT CHARSET=utf8;/'>dp2.sql
</span><span class='line'>$ mysqldump --user=$DB2USER --password=$DB2PASSWORD --add-drop-table \
</span><span class='line'>--no-data $DB2NAME| grep ^DROP |mysql --user=$DB2NAME --password=$DB2PASSWORD \
</span><span class='line'>$DB2NAME # to drop all existing tables
</span><span class='line'>$ mysql --user=$DB2USER --password=$DB2PASSWORD $DB2NAME &lt;dp2.sql</span>

and the problem was solved!.

Then it got me thinking, how actually get a from “Japonés en viñetas” to “Japonés en viñetasâ€. So I tried to achieve the same result from the command line:

1
2
3
4

1
2
3
4
<span class='line'>$ echo \“Japonés en viñetas\” 
</span><span class='line'>“Japonés en viñetas”
</span><span class='line'>$ echo \“Japonés en viñetas\” |iconv -f latin1 -t utf-8
</span><span class='line'>“Japonés en viñetasâ</span>

That’s not quite what I was expecting. Then I read the Wikipedia article on ISO-8859-1/Latin1 and I found that Latin-1 is confused with Windows-1253 and that “Many web browsers and e-mail clients will interpret ISO-8859-1 control codes as Windows-1252 characters in order to accommodate such mislabeling”

So I tried it

1
2
3
4
5

1
2
3
4
5
<span class='line'>$ echo \“Japonés en viñetas\” 
</span><span class='line'>“Japonés en viñetas”
</span><span class='line'>$ echo \“Japonés en viñetas\” |iconv -f windows-1252 -t utf-8
</span><span class='line'>“Japonés en viñetasâ€
</span><span class='line'>iconv: (stdin):1:25: cannot convert</span>

There it is the " becomes “. when it actually UTF-8 but misintepreted as Windows-1252

Copyright © 2015 - Ruben Laguna - Powered by Octopress